This how to guide will walk you through making a PEX pipe connection to ASTM-F1807 metal PEX fittings and ASTM-F2159 Poly PEX fittings using copper crimp rings.
In this blog we will go over what is needed to ensure they are properly connected.
Tools Required
- Pipe Cutter
- Crimp Tool
- ASTM-F1807 Crimp Ring GO / NO-GO Gauge
Getting Started
A “test” crimp should be done to ensure that the crimp tool is adjusted and working properly before starting a PEX installation. Normal wear tends to increase the crimp diameter over time. If the joint does not pass the go/no-go gauge test, adjustment or replacement is required. It is important to Maintaining and adjust the tool following the manufactures instructions is important.
We recommend "hand fitting" the piping to finalize the layout, making sure to slip a copper ring on the pipe for each barb. Once the layout is finalized crimping each connection can begin making every connection permanent. Crimp ring connections are ready for service whether the installation temperature is hot or cold, unlike Cold Expansion PEX (CEP) connections which require a wait time for the pipe to return to a set position. The system can be pressure tested immediately after making all crimp connections.
Installation Instructions
Please review the full installation instructions before starting.
 Step #1
Cut the pipe to the desired length, using a pipe cutter, making sure the cut is smooth and square to the end of the pipe. A jagged, angled or rough cut may cause the connection to fail.. Do not use a hacksaw.
 Step #2
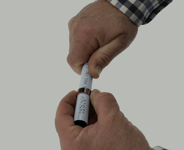
Select the correct size of copper crimp ring and slide it approximately 2” past the end of the PEX pipe.
.png?width=177&name=insert%20fitting%20(1).png) Step #3
Step #3
Insert the fitting into the PEX pipe until the pipe is against the shoulder of the fitting.
Step #4
Slide the ring towards the fitting, positioning the crimp ring 1/8” - 1/4” from the end of the pipe. This distance is critical to ensure that the crimp ring is positioned directly over the ribs or barbs of the fitting, as demonstrated in the illustrations below.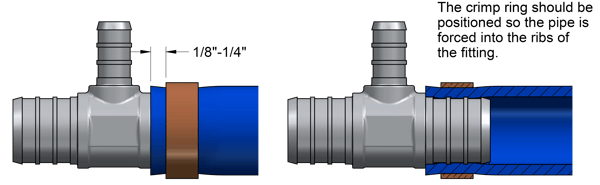
 Step #5
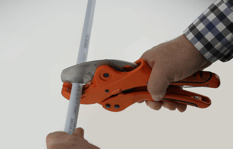
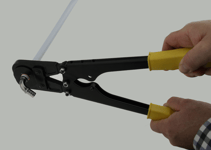
Center the crimping tool jaws over the ring. Holding the tool at a 90° angle to the fitting, close the jaws completely.
Step #6
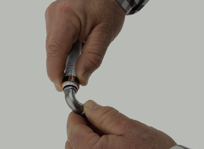
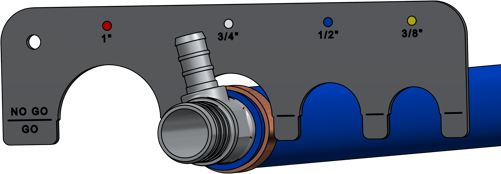
Check every crimp joint using a GO / NO-GO gauge. Hold the gauge at a 90° angle and slide it over the crimp ring. Instruction for two types of gauges are listed below.
Type A - Single Slot – GO / NO-GO Stepped Cut-Out
This type of gauge only needs to put onto the crimp ring one time making it faster to use.
When crimped properly the crimp ring will enter the U-shaped cut-out up to the line between the GO and NO-GO markings and stop midway. If the gauge can be rotated around the circumference of the crimp ring, the joint has been made correctly. If the crimp ring does not enter the first step it has not been crimped enough, or if the ring enters all the way to the bottom of the U cut-out it is over compressed. If the joint fails either of these two tests, then disassemble the joint and return to Step 1.
 GOOD CRIMP – Ring enters gauge part way stopping at the NO-GO step

BAD CRIMP – (Left) Ring will not enter the GO step
(Right) Ring enters gauge all the way into the NO-GO step
Type B Double Slot - GO and NO-GO Cut-Outs
This type of gauge is simple to use but it requires a GO test be performed first and then the gauge must be re-positioned to perform a second NO-GO test.
The joint has been made correctly if the crimp ring fits into the “GO” slot and can rotate around the circumference of the ring. Mark the fitting to indicate all the connections have been completed and tested. In the event the joint does not fit into the “GO” slot then the joint was not formed correctly. An improper crimp has been formed when (1) the “GO” slot does not fit over the ring or, (2) the “NO-GO” slot fits over the ring. If the joint fails either of these two tests, then disassemble the joint and return to Step 1.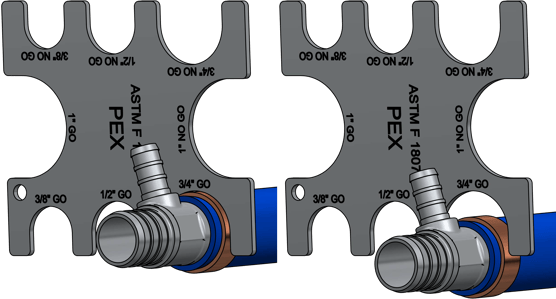
(Left) GOOD CRIMP – Ring fits in GO gauge
(Right) BAD CRIMP - Ring does not fit in GO gauge
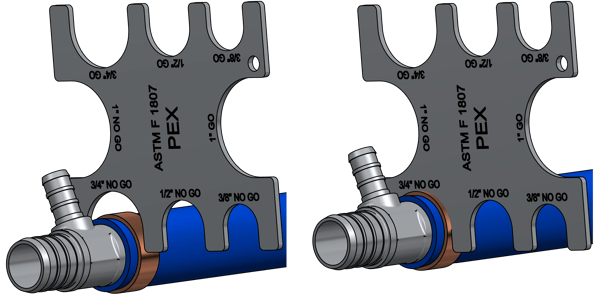 (Left) GOOD CRIMP – Ring does not fit into NO-GO gauge
(Right) BAD CRIMP - Ring fits into NO-GO gauge
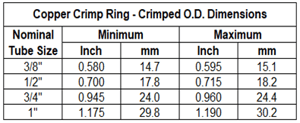 A vernier or micrometer can be used to measure outside diameter (O.D.) of a crimp ring after it has been crimped if a GO/NO-GO gauge is not available. A properly crimped ring will measure within the range detailed in the chart.
Being aware of the whole process before starting the project can help make it easier and cut back on mistakes. Ensuring each and every copper crimp ring is crimped properly may seem excessive but can prevent a leak down the road. Remember, these instructions apply to both metal and poly PEX fittings. Stay tuned to see how to remove copper crimp rings ensuring the fitting isn't damaged and can be used again!
.png)

SHARE