Connections made using S.S. Pinch Clamps with an interlocking design provide the same high integrity connection as a copper crimp ring connection. Pinch clamps can be used on stainless steel, brass and poly fittings.
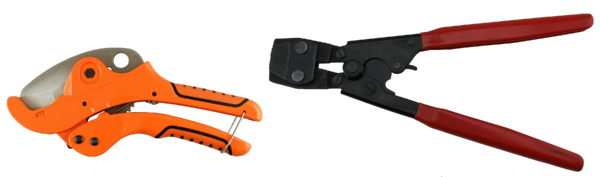
Tools Required
- Pipe Cutter
- Ratchet Type Pinch Clamp Tool
Some of the advantages of pinch clamps are.
- It is almost impossible to make a bad joint when using a ratchet action type pinch clamp tools do not allow the tool to return to it’s open position until the tool has been completely closed. This ensures the ear of the clamps have been properly formed fully compressing the connection.
- A single tool is used for all sizes from 3/8” to 1”.
- The pinch clamp system is easier to use when making connections in tight, hard to access locations.
- It is easy to determine if the connection has been made by visually inspecting the formation of the ear on the clamp.
The system can be “hand fit” together to finalize the layout, the installer can then go back and pinch each clamp to make the connection permanent. After all connections have been pinched, the system can be pressure tested immediately. Pinch clamps like copper crimp ring connections are immediately permanent whether the installation temperature is hot or cold. Unlike Cold Expansion PEX (CEP) there is no need to wait for the pipe to return to a set position.
Please review all of the steps the installation instructions before getting started.
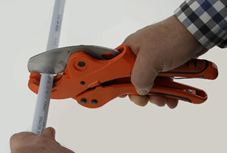
1. Using a pipe cutter, cut the pipe to desired length making sure the cut is smooth and square to the end of the pipe. A rough, jagged or angled cut may result in a failed connection. DO NOT use a hacksaw.
2. Select the correct sized pinch clamp and slide the clamp approximately 2” past the end the of the PEX pipe.

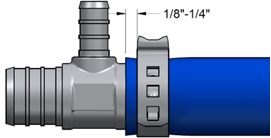
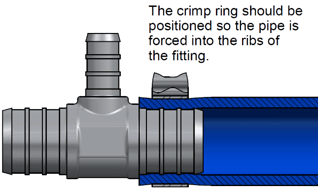
3. Insert the fitting into the PEX pipe until it touches the shoulder of the fitting. Then slide the pinch clamp back towards the fitting, positioning the clamp 1/8” - 1/4” from the end of the pipe.
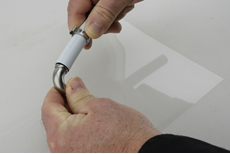
This distance is critical to ensure that the pinch clamp is positioned directly over the ribs or barbs of the fitting.
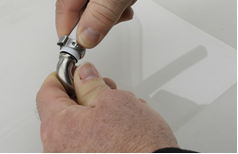
4. Position the open jaws of the ratchet type pinch clamp tool over the ear of the clamp and squeeze, making sure the handles are fully closed to properly compress the connection. NOTE: The tool is designed so it will not open unless the tool has been fully closed.
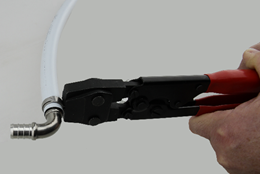
5. Check that the connection is secure. Proper installation can be easily verified by visually inspecting the clamp. The ear must be formed as in the illustration which shows a clamp before it is pinched (left) and a properly formed ”pinched” clamp on the right.


SHARE