Are you looking to spice up your dull office space? Needing something unique to add to your home? Try doing a DIY project using malleable iron! Malleable iron fittings can be painted to fit right in with any room themes and are easy to use.
In this post, we will cover two DIY projects that will add some pizzazz to your home or your office. The first item is a computer table and the second is a wine rack. We will look at the materials used and how to build the items. Let's go!
Computer Table
 Looking for a way to elevate your TV at home or computer at work? You're in luck! We have a quick and easy DIY project using malleable iron fittings that also looks really cool! The computer tables on the left are built using black malleable iron and requires a total of 35 fittings! Before purchasing all the material, you should determine the size of the table you wish to build to ensure you purchase the correct sized fittings and the lengths of the nipples. You will also need a piece of wood for the top of the table, this can be any piece of wood you wish to use.
The materials you will require are: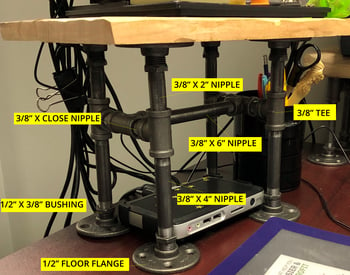
- 4 x 3/8" x Close Nipple
- 8 x 1/2" x 3/8" Bushing
- 8 x 1/2" Floor Flange
- 4 x 3/8" x 4" Nipple
- 6 x 3/8" Tee
- 1 x 3/8" x 6" Nipple
- 4 x 3/8" x 2" Nipple
Once you have gathered all your materials, you can start building! Simply thread each component together until you have built the base of the table. The top flanges are screwed to the bottom of the wood.
 Wine Rack
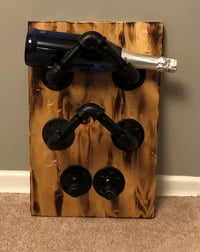
Do you have rogue wine bottles that are needing a home? This project may be for you! This simple to build wine rack can hold two bottles of wine and a wine glass. This particular wine rack was attached to a piece of wood but the fittings could easily be attached right to the wall or even on the side of a cabinet.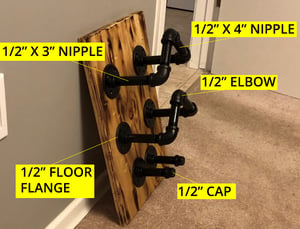
The materials used to create this wine rack are:
- 6 x 1/2" x 3" Nipple
- 6 x 1/2" Floor Flange
- 2 x 1/2" Cap
- 4 x 1/2" x 4" Nipple
- 6 x 1/2" Elbow
Once all of the material has been collected and painted if that's what you want, you can start to create the wine rack. The fittings can be assembled together simply by threading the nipples to the flanges, elbows and caps. Remember, this wine rack can be made using any size of malleable fitting, if you would like it larger you can use 3/4" or 1" fittings.
Doing it yourself can be very rewarding. Don't be afraid to try new combinations, that's how you find exactly what works best for you and your application. These two examples can easily be transformed with a little bit of creativity to be used for it's original purpose or perhaps for something entirely different! The possibilities are endless.

.png)
.jpg)
SHARE