Doing it yourself has become a popular trend that has transformed our homes and required us to channel our creativity. People all over the world have taken to Social Media and other platforms to share how they created unique items out of everyday materials without any professional knowledge. Recently, the DIY trend has expanded into the world of Plumbing. Malleable iron fittings are being used in homes, restaurants, winery's and businesses to add a one-of-a-kind conversation piece.
In this post, we will explore two items that were created using malleable iron fittings and walk through the materials used and exactly how the item was put together. Let's get started!
Rack
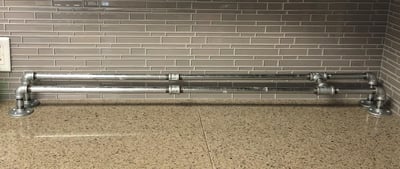 The first item we will take a look at is a rack that can be used for bath towels, clothing and more.
The first step is to determine how big you would like it. This rack can be any size that you require, you would just select a smaller or larger piece of ready cut pipe.
The materials used in this pictures are galvanized and the sizes and parts are:
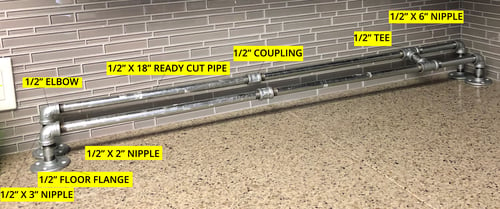
- 2 x 1/2" x 18" Ready Cut Pipe
- 4 x 1/2" Elbow
- 3 x 1/2" x 2" Nipple
- 2 x 1/2" x 3" Nipple
- 4 x 1/2" Floor Flange
- 2 x 1/2" Coupling
- 2 x 1/2" x 6" Nipple
- 2 x 1/2" tee
The tees and nipples are optional. Once you have all the parts, you can start to assemble. Simply thread the nipples and pipe to the appropriate fittings to create the rack look. The 1/2" x 3" nipples are used for the back row. This particular item was not painted, but galvanized pipe can be painted. If you wish to have a black rack, you can paint the rack after assembly and let dry.
There you have it! A brand new rack for a multitude of uses that you did yourself! This type of rack could be used to display other things as well, such as spices in your kitchen? Use your creativity!
Toilet Paper Holder
-1.png?width=300&name=My%20Post(9)-1.png) The second item we will take a look at is a toilet paper holder. Similar to the rack, you will have to determine how big you would like the holder. Depending on the size, you can use a larger or smaller nipple or if you'd like the entire holder larger you can use 3/4" or 1" fittings. For this particular toilet paper holder, we used 1/2" fittings. All the items are galvanized and then painted black.
The second item we will take a look at is a toilet paper holder. Similar to the rack, you will have to determine how big you would like the holder. Depending on the size, you can use a larger or smaller nipple or if you'd like the entire holder larger you can use 3/4" or 1" fittings. For this particular toilet paper holder, we used 1/2" fittings. All the items are galvanized and then painted black.
The size and parts used in the picture are:-2.png?width=400&name=My%20Post(9)-2.png)
- 1 x 1/2" Floor Flange
- 1 x 1/2" x 2-1/2" Nipple
- 1 x 1/2" Elbow
- 1 x 1/2" x 6" Nipple
- 1 x 1/2" Cap
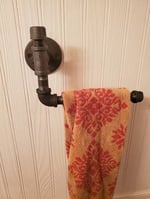 The components can then be assembled to create the toilet paper holder. This item can also be used as a towel holder which may require a larger nipple depending on the size of towel. The picture on the left is an example of how this concept is used for a towel holder. Different parts were used to create this towel holder including a tee but this is a great example on how there an array of ways to create the same thing by using different parts.
Keep in mind when "DIYing", there are no rules! Don't be afraid to try stuff out and use trial and error to determine which is the best way for you to create the outcome your after. There are many different combinations of parts that can used to create the same thing so use what works best for you and your home!
-1.png)


SHARE